
Mount velcro patches on MOLLE webbing: complete 2026 workflow
Instead of pressing a hook-backed patch against bare MOLLE and hoping friction develops a work ethic, attach a compatible loop-faced adapter, then press the patch onto it. This 2026 guide covers mounting velcro patches on molle webbing, checking the attachment, and swapping your Stickthison morale patches without rebuilding the whole setup.
- Mount velcro patches on molle webbing with a compatible loop-faced adapter; ordinary webbing does not replace loop fabric.
- Stickthison morale patches suit gun owners and range-goers who want parody on their gear; check each patch’s backing.
- Weave compatible attachment straps correctly, support patch edges, and keep pockets and adjustment hardware clear.
- Use existing loop fabric when it fits; add an adapter only where your gear needs one.
Why this matters
MOLLE attachment and hook-and-loop fastening do different jobs. MOLLE-compatible gear attaches through webbing or compatible slots; a hook-backed patch grips loop fabric. Pressing hooks against ordinary nylon webbing skips the part that actually holds your joke in place.
The adapter attaches to the bag; the patch attaches to the adapter. Keep those jobs separate and troubleshooting stops being a séance.
For your 2026 gear setup, choose the mounting location before choosing the biggest patch you can find. A joke that blocks a zipper has stopped contributing to morale.
Before you start
- Check the patch backing. You need exposed hook backing for a loop-faced panel. If a removable loop cover protects the hooks, peel off that cover first; do not pull apart sewn layers.
- Gather compatible materials. Have your bag or other gear, the patch, a ruler, and a loop-faced MOLLE adapter with its specified attachment hardware. Access the webbing from both sides where the attachment requires it.
- Check the gotcha: attachment geometry. Traditional PALS uses 1-inch-wide webbing, but that alone does not establish compatibility. Check the adapter’s required rows, channels, strap routing, and clearance against your actual gear before starting.
An adapter is not automatically compatible because its description contains the word tactical. Neither is your coffee mug, despite the camouflage.
Choose the right mounting method
These are attachment methods, not interchangeable hardware. Use the instructions supplied with the adapter you choose.
| Mounting method | Best for | Advantage | Limitation |
|---|---|---|---|
| Existing loop panel | Gear that already has a suitably sized loop area | No additional attachment hardware | Location and usable area are fixed |
| Weave-on loop adapter | Compatible webbing with enough accessible rows | Alternating attachment straps can secure the panel against the gear | Requires correct routing and compatible dimensions |
| Wrap-around loop adapter | Accessible webbing that matches the adapter’s wrap system | Avoids a long weave when the design permits | Closures need access and must not crowd adjacent gear |
Best for most bare-webbing setups: a compatible weave-on loop adapter. Its advantage is a mechanical attachment through the webbing; its drawback is the setup work and space it occupies. If a suitable loop panel already exists, use it instead of adding hardware for the privilege of adding hardware.
Mounting location and fit
Check the footprint
- Lay the patch over the proposed location without attaching anything. Keep the bag in its normal orientation so upside-down placement does not become your new personality.
- Measure the patch and the adapter’s usable loop face. For a 3-inch by 2-inch patch, check both dimensions against the loop area—not the panel’s overall dimensions or its attachment straps.
- Check the adapter’s rear attachment footprint separately. Its straps must align with the available webbing or slots, even when the patch fits the front perfectly.
Expected result: The patch fits the loop face, and the attachment system fits the gear. These are separate checks; passing one does not excuse failing the other.
Check access
- Open the nearby pocket completely. Move every zipper pull through its normal travel and check that fingers still reach the opening.
- Move nearby buckles, handles, and adjustment straps. Leave their working paths clear rather than planning to shove the patch aside every time.
- Check whether the proposed location interferes with an existing pouch attachment. Do not steal an occupied channel unless both attachment systems explicitly permit the arrangement.
Expected result: The mounting position remains clear during ordinary use. Photograph the location if you want a reference before removing nearby accessories.
Your 2026 layout should pass the boring access check before the funny patch gets a vote. That is not anti-fun; it is anti-fumbling-around-with-a-stuck-zipper.
Adapter attachment
Weave-on installation
- Orient the loop face outward and align the adapter’s attachment straps with the gear’s channels. Confirm the intended top edge before threading anything.
- Following the adapter’s instructions, alternate each attachment strap through the gear’s webbing and the adapter’s corresponding rear attachment points. Do not simply slide a strap behind every row while bypassing the adapter’s attachment points.
- Work out slack as you progress, keeping the adapter flat. Avoid twisting straps or trapping loose fabric inside the weave.
- Secure each terminal closure exactly as its manufacturer specifies. Check that snaps, tabs, or other closures are fully engaged and accessible for later inspection.
Expected result: The adapter lies against the gear without loose attachment straps or an unsecured end. Pull gently on its edges; it should not slide freely along the webbing.
The exact route depends on the hardware. If the supplied instructions and your available webbing do not agree, stop and choose a compatible mounting position or adapter. Improvisation is great for range-day excuses, less great for attachment systems.
Wrap-around installation
- Confirm that the adapter is designed to wrap around your type of webbing. Do not turn an unrelated strip of hook-and-loop material into a mystery attachment and call it engineering.
- Route each wrap around the specified webbing section, keeping the loop face outward. Follow the required closure overlap or fastening method in the adapter’s instructions.
- Close the wraps without twisting or bunching the webbing. Keep closures away from zipper paths and hardware that repeatedly rubs across them.
- Pull gently at the panel edges and check the closures again. Reposition the adapter if a closure cannot sit flat.
Expected result: The panel stays in position, its closures remain engaged, and adjacent gear moves normally. If the adapter rotates or loosens, correct its fit before attaching the patch.
Patch attachment and verification
Mount the patch
- Inspect the hook backing and loop face. Remove loose lint or debris gently, following the material’s care instructions; do not attack the backing with solvents or a wire brush.
- Separate any removable loop cover from the patch. Align the patch over the panel before letting the hooks make contact.
- Press across the entire patch face, including the edges. Avoid leaving a corner unsupported beyond the usable loop area.
- Inspect the perimeter. Reposition the patch if exposed hooks catch neighboring fabric or an edge projects into a snag point.
Expected result: The hook-backed area contacts the loop face, the corners lie down, and the patch does not obstruct access. A large PVC face does not compensate for a tiny contact area behind it.
Use this sequence for your 2026 mounting check: Align, Weave, Close, Press, Check. The weave stage applies to weave-on adapters; use the specified wrap procedure for wrap-around designs.
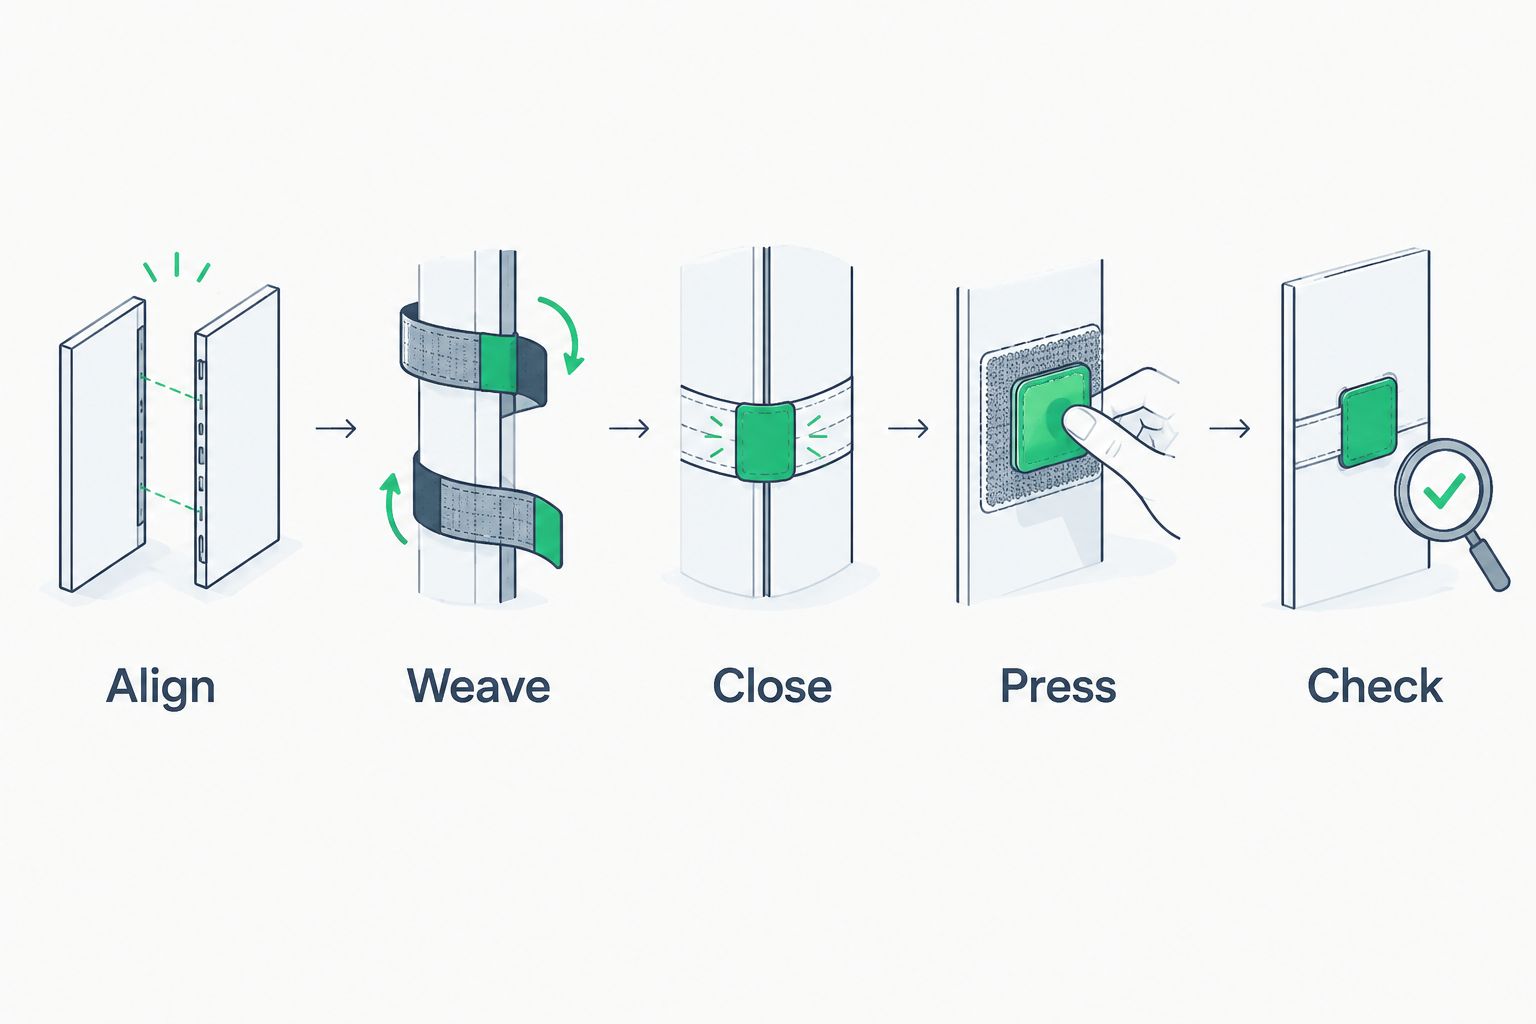
Check the loaded setup
- Pack the bag as you normally use it. A curved or stuffed panel can behave differently from an empty bag lying flat.
- Open nearby pockets, lift the bag by its intended handle, and move adjustment straps through their normal range. Keep the patch and adapter clear of those movements.
- Check for lifting corners, panel rotation, and loose closures. Correct the cause rather than pressing the patch harder and declaring victory.
Expected result: The loaded bag works normally and the mounting system stays seated. This is a practical fit check, not a certification or a promise that nothing can ever snag.
Swap patches without removing the adapter
Best for rotating designs: leave a correctly fitted loop adapter installed and change only the patch. That preserves the attachment routing while letting you adjust the joke to match the day’s administrative nonsense.
- Hold the loop adapter against the bag with one hand. Peel the patch back from an edge rather than yanking the whole assembly away from the webbing.
- Inspect the newly exposed loop surface and remove loose debris. Check the adapter closures while they are easy to see.
- Compare the replacement patch with the usable loop area. A different shape needs a fresh fit check even if its overall width looks similar.
- Press the replacement patch into place and repeat the pocket-access and corner checks.
Expected result: The design changes without disturbing the adapter’s mounting straps. Keep a removed hook-backed patch on its protective loop cover when practical so it does not recruit every fuzzy object in your bag.
Stickthison morale patches are best for gun owners and range-goers who want parody on their gear. The trade-off is straightforward: a design you like still needs compatible backing and a properly sized mounting surface. Humor does not provide mechanical retention.
Troubleshooting
The patch will not grip
Check which surfaces are touching. Hooks need loop fabric, not bare webbing, another hook surface, or the outside of a protective backing cover. Remove a removable cover if present, clean away loose debris, and check for worn fastening material.
The whole adapter moves
Inspect the attachment route and terminal closures. A strap routed behind the webbing without the specified alternating attachment can leave the panel loose. Reinstall according to the adapter’s instructions; choose different hardware if the available webbing cannot support that route.
The corners keep lifting
Check whether the patch extends beyond the loop face or sits across a sharply curved section. Move it to a flatter location or use a better-matched panel. Do not glue down a removable patch to conceal a sizing problem.
The patch catches your sleeve or zipper
Look for exposed hooks and projecting edges. Recenter the patch, choose a panel that supports its backing, or relocate the assembly outside the moving path. The zipper should not need permission from your morale patch to operate.
The adapter will not thread through
Stop forcing the attachment strap. Check for occupied channels, incompatible slots, twisted straps, or an obstructed route behind the webbing. Follow the specified installation method; do not cut stitching or enlarge slots to make incompatible hardware fit.
Customize your workflow
For a 2026 gear refresh, separate display space from working space. Put patches where you can see them without sacrificing a useful pouch position, handle, or adjustment point. Leave heavily used attachment areas available for the equipment that actually needs them.
Best for expanding beyond MOLLE: choose the attachment method for the surface. The guide to attaching a morale patch without sewing covers the next question when your preferred location lacks webbing.
Before ordering several designs, measure every intended display location. Matching the patch backing and footprint to each surface beats discovering that your carefully planned rotation only fits one bag.
FAQ
Can you put velcro patches directly on MOLLE webbing?
A hook-backed patch needs loop fabric; ordinary MOLLE webbing is not a substitute. Use an existing loop area or attach a compatible loop-faced adapter to the webbing.
What is the best way to attach a patch to bare MOLLE?
A compatible weave-on loop adapter is a practical choice when enough accessible webbing is available. Follow its specified attachment route and verify that the patch fits its usable loop face.
Do I need to sew a loop panel onto my range bag?
No, a compatible removable MOLLE adapter provides a loop face without sewing. Check that its hardware fits your bag’s webbing or slots before installing it.
Why does my patch fall off even with an adapter?
Inspect for incomplete hook-to-loop contact, debris, worn fastening material, or unsupported corners. Also check whether the adapter itself is loose; patch grip and adapter attachment are separate problems.
Can I use adhesive hook-and-loop tape on nylon webbing?
Do not assume adhesive tape is suitable for your webbing. Adhesive compatibility depends on the tape and fabric, while a compatible mechanical adapter attaches through the webbing without relying on adhesive bonding.
Will Stickthison patches fit any MOLLE loop adapter?
Check each Stickthison patch’s backing and dimensions against the adapter’s usable loop face. A morale patch design alone does not establish attachment compatibility or fit.
Can I swap patches without unweaving the MOLLE adapter?
Yes, leave a correctly installed loop adapter attached and peel off only the patch. Support the adapter while peeling, then check that the replacement patch fits and its corners lie down.
One last thing
Check the mount with the bag packed, not just looking pretty on the table. A full pocket changes the surface behind the patch. If the corners lift only after packing, fix the location or panel fit before blaming the hooks for having commitment issues.


Comments