

Mount a water bottle clip on MOLLE gear: complete 2026 workflow
Instead of fishing a loose bottle out of your range bag, attach your water bottle clip to MOLLE webbing with the mount its manufacturer specifies, secure the closure, and check it with the bottle filled. This 2026 workflow covers woven straps, rigid adapters, bottle retention, and the part everyone skips: making sure you can still open your damn bag.
- To attach water bottle clip to MOLLE webbing, match the mounting mechanism before threading anything.
- Weave flexible attachment straps; install rigid MOLLE adapters according to their specific closure design.
- Test bottle retention and loaded movement separately; a secure mount does not guarantee a secure bottle.
- Stickthison morale patches suit gun owners personalizing gear; mounting hardware still needs its own compatibility check.
Why this matters
A bottle attachment has separate jobs: stay on the bag, retain the bottle, and keep the load from getting in your way. Passing one check does not excuse failing another. A clip can stay attached beautifully while your bottle auditions for a downhill event.
For your 2026 setup, prioritize access and retention over filling every available webbing slot. Keep the bottle away from zipper paths, grab handles, adjustment straps, and equipment you need to reach immediately.
Stickthison is best for gun owners who want parody morale patches for their gear. That is the personality department; bottle retention belongs in the hardware department. Keep those jobs separate.
Before you start
- Gather the actual combination: your bag or carrier, bottle clip, supplied mounting hardware, bottle, and the manufacturer's attachment instructions. Fill the bottle for the final check, but start fitting with it empty.
- Identify both attachment interfaces: determine how the mount connects to the webbing and how the clip holds the bottle. A neck collar, handle connection, and bottle pouch are not interchangeable. Confirm that the intended bottle interface fits without force.
- Catch the compatibility trap early: conventional sewn PALS uses 1-inch-wide webbing, 1-inch vertical gaps, and stitching at 1.5-inch intervals. Laser-cut panels and proprietary mounts need their own fit check; looking vaguely tactical is not a dimensional standard.
Those conventional measurements describe the attachment grid, not a universal clip specification. Do not force a rigid adapter through a slot because the packaging says MOLLE somewhere near a flag.
If you have not selected an attachment yet, compare mechanisms in the water bottle clips for tactical gear guide. Choose for your bottle and panel, not the accessory's ability to look serious in a product photo.
Choose the mounting mechanism
Match the installation method to the hardware in your hand. Flexible straps weave; rigid adapters slide, hook, or lock according to their design. A generic instruction to weave everything is how you turn a straightforward job into a warranty question.
| Mounting option | Best for | Advantage | Limitation | Installation rule |
|---|---|---|---|---|
| Flexible interweaving strap | Stable mounting when the attachment provides matching rear channels | Connects the attachment and panel through alternating passes | Incorrect routing leaves slack | Alternate between panel rows and attachment channels |
| Rigid MOLLE adapter | Mounts designed around a specific locking adapter | Provides a defined attachment interface | Slot fit and closure depend on the adapter | Follow the adapter's insertion and locking sequence |
| Carabiner through a webbing loop | Simple hanging carry where movement is acceptable | Easy to remove | Leaves the bottle free to swing and rotate | Check gate closure and accept the movement trade-off |
| MOLLE-mounted bottle pouch | Carry that benefits from supporting the bottle body | Supports more than a neck or handle | Takes more panel space and requires bottle fit | Mount the pouch correctly and secure its retention system |
A carabiner hanging from a loop is not the same setup as an interwoven attachment. Neither is automatically wrong, but they solve different problems. If you want a bottle held close to the bag, do not mistake easy hanging for controlled carry.
Mounting workflow for 2026
Mount position
- Empty the mounting area. Move loose straps and accessories out of the intended path. Inspect the webbing, stitching, panel slots, and clip for visible damage before adding the bottle.
- Hold the bottle in place. Support the bottle by hand where it will hang. Check its bottom, cap, and widest point against nearby pockets and the ground when the bag rests upright.
- Check your normal access. Open the adjacent pocket, use the grab handle, and operate the shoulder straps. On worn gear, check that the bottle does not obstruct emergency equipment or your normal movement.
- Choose the final location. Favor a position that keeps the bottle close to the bag without burying its release. Balance the loaded bag rather than choosing whichever empty loop looks lonely.
Expected result: the bottle has a clear resting position, and you can operate nearby gear without moving it out of the way.
Repeat that access check with the bag in its normal carrying position. A bottle that clears everything on the kitchen table can land directly against your elbow once the shoulder strap takes the load.
Webbing connection
- Identify the mounting hardware. Separate the attachment strap from the bottle-retention piece. Open only the closure intended for installation; do not bend rigid components to imitate a flexible strap.
- Start the correct route. For an interweaving mount, pass the flexible strap behind the selected panel row, then through the corresponding channel on the attachment. Continue alternating between the panel and attachment for the route the design provides.
- Seat a rigid adapter as specified. If your mount uses a slide-on, hooked, or locking adapter, follow its particular insertion sequence instead. Stop if seating it requires distorting the panel or forcing the lock.
- Close the attachment. Engage the supplied snap, latch, keeper, or other closure fully. Remove twists and check that no fabric is trapped where it prevents closure.
- Pull on the mount itself. Support the bag and tug the empty attachment in the direction the bottle will load it. Watch the closure and webbing rather than congratulating yourself because it stayed put once.
Expected result: the attachment remains seated, its closure stays engaged, and the mounting route has no unexplained slack or skipped channels.
A flexible strap passing behind several panel rows without returning through the attachment is not interwoven. Reopen it and correct the route. Cinching harder does not repair the wrong path.
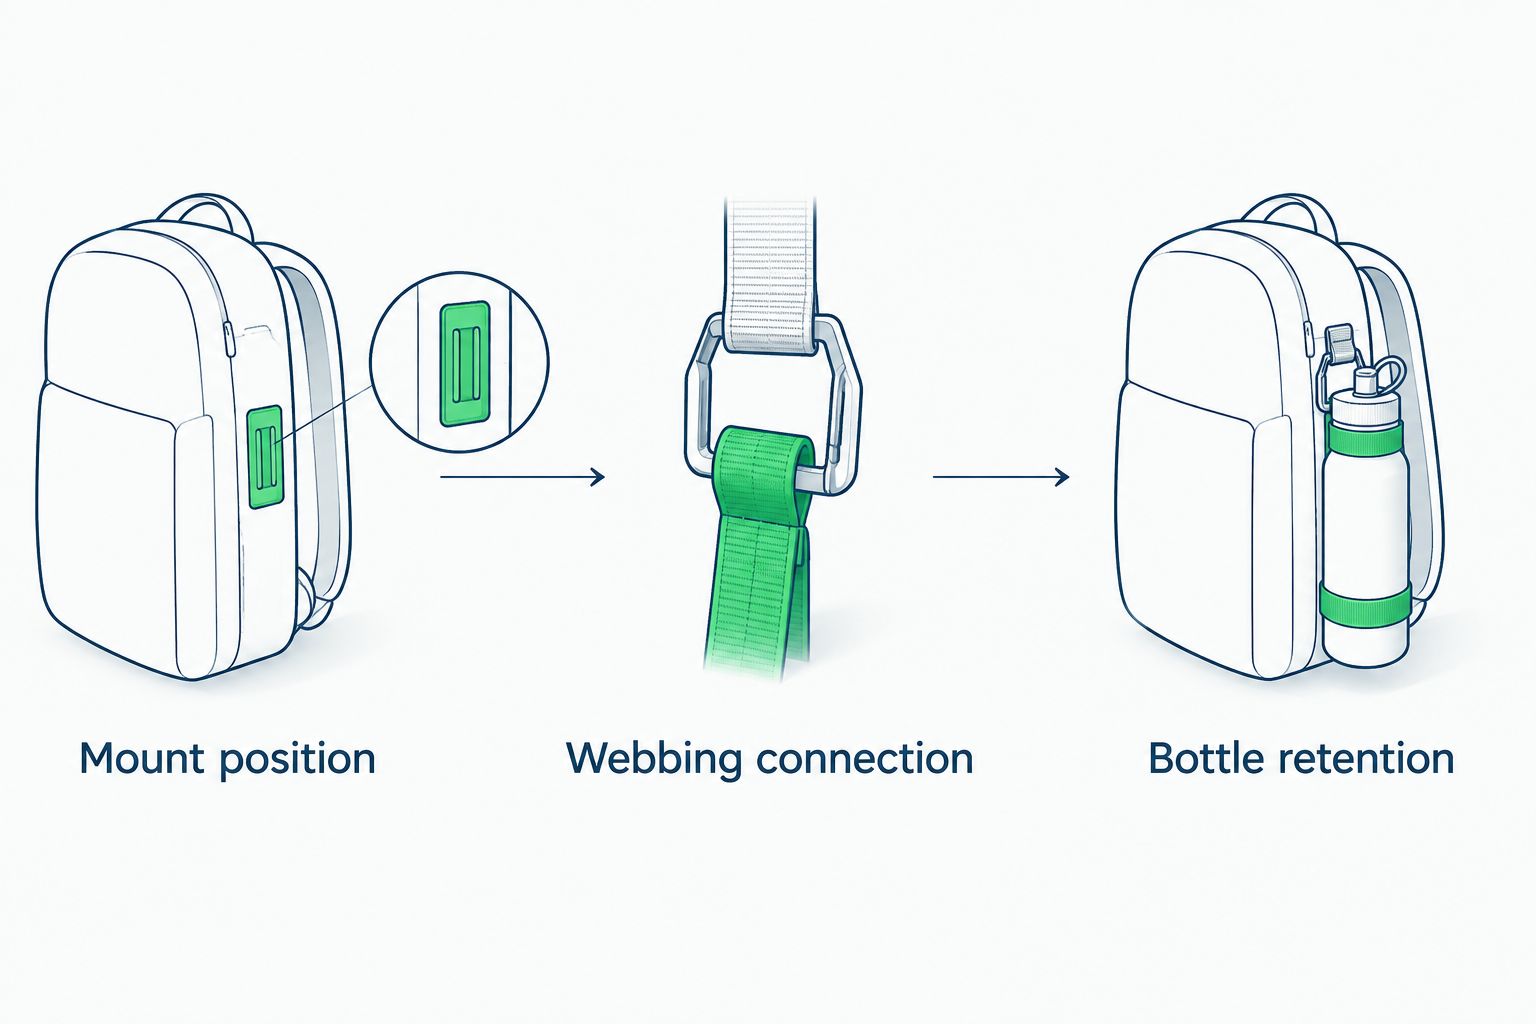
Bottle retention
- Fit the empty bottle. Engage the collar, handle connection, or retaining mechanism exactly where its design intends. Do not assume a neck collar belongs on the cap or that every carry loop supports a suspended bottle.
- Check the release. Confirm that the bottle-retention closure engages fully and remains accessible. Keep loose fabric away from a gate, buckle, or latch.
- Fill and refit the bottle. Load the bag as you normally carry it, then attach the filled bottle. Support the setup over a clear surface while you check that the bottle cannot slip through its holder.
- Walk and change position. Put the bag on, walk, turn, sit, and bend as your normal use requires. Watch for swinging, rubbing, accidental release contact, and interference with pockets or straps.
- Remove and replace the bottle. Practice your normal drinking routine. Verify that removing the bottle does not require disturbing the panel mount unless the design specifically works that way.
Expected result: the filled bottle stays retained during ordinary movement, and you can remove and replace it without fighting the rest of your gear.
Reject the setup if the closure opens, the bottle slips, or the mount damages the panel. A garage check does not establish a load rating. Use the manufacturer's stated limits, and never treat a bottle clip as climbing or personal-safety equipment.
Move the same clip between bags
Moving a bottle attachment from your range bag to a daypack is a legitimate second workflow. It saves you from rebuilding the bottle interface, but the panel connection still needs a fresh installation check.
- Remove the bottle first. Take the load off the attachment before opening its mounting closure.
- Release the mount deliberately. Unweave flexible straps in reverse order, or use the rigid adapter's specified release. Do not pull harder because the attachment has developed an emotional bond with the bag.
- Inspect the receiving panel. Confirm the new location accepts the hardware without forcing, stretching, or trapping seams.
- Repeat the loaded check. Reinstall the mount, fill the bottle, and check access and movement on the receiving bag.
Best for: users who alternate between bags and accept the time needed to reinstall correctly. The benefit is reusing an attachment; the drawback is repeating the setup checks.
If you transfer the bottle frequently, keeping a compatible mount on each bag avoids repeated weaving. That adds hardware and still requires checking each mount independently. Convenience is not permission to skip compatibility.
Troubleshooting your 2026 setup
The attachment flops away from the panel
Check the routing before blaming the webbing. A flexible mount that skips the attachment's rear channels can leave a loose connection even when its end closure is fastened.
Unload it, reopen it, and alternate through the intended panel rows and attachment channels. For rigid mounts, inspect seating and closure instead; weaving advice does not apply to a slide-on adapter.
The bottle swings into your leg or bag
A freely hanging bottle can pivot around its attachment. Move it to a less exposed position, or choose a compatible system that supports the bottle body rather than adding improvised knots around the neck.
Best for reducing swing: a correctly fitted bottle pouch. Its trade-off is panel space. Keep any retention strap clear of the bottle release and nearby bag controls.
The webbing shows abrasion or pulled stitching
Remove the bottle and inspect both sides of the connection. Look for sharp hardware edges, a twisted mount, concentrated rubbing, or a connection that loads a damaged section of stitching.
MOLLE pouch durability belongs in the same inspection as bottle-mount wear: examine fabric, stitching, and attachment hardware separately rather than judging the setup by how tough the pouch looks. Stop using a damaged mounting point and follow the gear manufacturer's repair or replacement guidance.
The clip will not close completely
Remove the bottle and check for trapped fabric, incorrect orientation, dirt, or an incompatible panel thickness. A latch resting against its catch is not necessarily latched.
Clean the mechanism according to its care instructions and reinstall without force. If it still cannot close fully, reject that hardware-and-panel combination. Pliers are not a compatibility upgrade.
The bottle slides out of its holder
Separate bottle fit from mount security. A perfectly attached clip cannot retain a bottle whose neck, handle, or body does not match its intended interface.
Use a compatible holder or bottle rather than modifying the bottle cap, grinding the clip, or trusting friction alone. Check removable carry handles and cap-mounted loops against the bottle manufacturer's intended use.
Customize your workflow
For a 2026 range-bag refresh, divide the exterior into working attachment space and decoration space. Keep bottle hardware accessible, keep pockets usable, and put the joke where it does not interfere with either. Your bag does not need every accessory competing for the same square of fabric.
Stickthison morale patches give gun owners a way to personalize that remaining space. The limitation is practical: patches do not retain bottles, reinforce worn webbing, or replace mounting hardware. Treat decoration as the finishing step, not structural engineering with a punchline.
Record which bottle and mount you checked together. When you change the bottle, move the attachment, or rearrange a nearby pouch, repeat the relevant fit and access checks. A setup that worked before the rearrangement has not automatically passed afterward.
FAQ
How do I attach a water bottle clip to MOLLE webbing?
Use the attachment method specified for your clip: interweave flexible mounting straps or seat and close its rigid MOLLE adapter. Then check bottle retention with the bottle filled and the bag loaded.
Can I just use a carabiner on MOLLE webbing?
A compatible carabiner can hang a bottle from a webbing loop, but it does not provide the same controlled mounting as an interwoven attachment. Check gate closure, bottle-handle suitability, and whether the resulting swing interferes with your movement.
Do all water bottle clips fit every MOLLE panel?
No. Adapter dimensions, closure designs, panel construction, and bottle interfaces differ, so check the actual combination before carrying it.
Why does my bottle clip keep flopping around?
An incorrectly routed strap or a freely pivoting attachment can leave the bottle moving away from the bag. Check the mounting route first, then determine whether the bottle needs body support from a compatible pouch.
Is a bottle pouch better than a neck clip?
A bottle pouch is better when you need support around the bottle body; a compatible neck clip leaves more of the bottle exposed. The pouch takes more panel space, while the clip requires careful bottle-neck compatibility and movement checks.
Can I attach a bottle to a laser-cut MOLLE panel?
Use a laser-cut panel only when its slots and construction accept the attachment as intended. Stop if installation distorts the panel, damages an edge, or prevents the hardware from closing.
Should I test the mount with an empty or full bottle?
Start fitting with an empty bottle, then perform the final check with the bottle filled and the bag normally loaded. Check walking, sitting, pocket access, and bottle removal rather than relying on a stationary tug alone.
One last thing
Check the bottle connection every time you change bottles—even when the webbing mount stays untouched. The attachment can remain perfectly secure while a different neck shape, removable handle, or cap changes the retention problem entirely.
Finish the mechanical checks before adding personality. Stickthison morale patches handle the joke; the bottle mount still has to handle the bottle. Neither benefits from pretending to be the other.


Comments