
One velcro patch, multiple gear pieces: 2026 swap system
Instead of peeling through your gear pile every time you change bags, build a velcro patch swap system: put compatible loop panels on the gear, move one hook-backed morale patch between them, and give it a parking spot when it’s off duty. This 2026 setup covers the fit checks, attachment choices, and transfer routine that keep your favorite joke out of the laundry hamper.
- A velcro patch swap system moves one hook-backed morale patch between compatible loop panels without permanent attachment.
- Stickthison suits gun owners who want parody PVC morale patches for their range gear.
- Match backing, panel dimensions, and surface shape before moving a patch between gear pieces.
- Use a dedicated loop parking panel so exposed hooks stay away from clothing and loose gear.
Why this matters
The loop panel stays with the gear; the hook-backed patch moves. That distinction is the whole system. A patch permanently sewn to your backpack is decoration with a mortgage, not a transferable setup.
Stickthison sells parody and morale PVC patches for gun owners and EDC enthusiasts. The artwork supplies the personality; backing compatibility decides whether that personality can migrate from your range bag to your everyday pack.
Your 2026 setup does not need matching bags or a tactical spreadsheet. It needs repeatable attachment points, enough room for the patch, and a habit that prevents the patch from disappearing between outings.
The trade-off is straightforward: one patch can serve several gear pieces, but it cannot decorate them all simultaneously. If you want every bag wearing the same design at once, swapping is the wrong workflow.
Before you start
- Gather the actual gear. Bring your hook-backed patch, every bag or hat you want to use, a ruler, and a spare loop panel for parking. Check each item’s care instructions before adding anything permanent.
- Inspect the mating surfaces. Hook is the rough, grabby side; loop is the softer receiving side. Confirm the patch and each gear panel actually engage rather than assuming anything fuzzy will work.
- Catch the hidden gotcha: backing covers. Some patches arrive with a separate loop piece covering the hooks. Remove that cover before testing attachment to an existing loop panel. Do not mistake it for a peel-and-stick mounting kit; separate loop fabric does not automatically include adhesive.
Work on an empty bag away from firearms, ammunition, and cleaning chemicals. You’re organizing morale patches, not auditioning for a gunsmithing disaster compilation.
Patch and panel compatibility
Check the backing
- Turn the patch over and identify the attachment surface. Look for actual hooks, not bare PVC, plain fabric, or adhesive.
- If a removable loop cover is attached, peel it away while supporting the patch. Keep the cover for storage if it fits securely.
- Press the exposed hooks onto a known loop panel, then peel the patch off while holding the panel steady.
- Check the backing attachment itself. Stop if the hook layer separates from the patch rather than releasing from the loop.
Expected result: the hooks engage the loop and release without the patch’s own backing coming apart. A sticker is not a substitute, even if the joke is excellent.
Measure the receiving area
- Measure the patch’s full width and height, including any protruding outline.
- Measure the usable loop area on each gear piece. Exclude seams, zipper paths, straps, and folded edges.
- Lay the patch over each panel before pressing it down. Check that the outline stays inside the usable area.
- Flex the gear into its normal shape. A flat panel on an empty bag can curve once you pack it.
For a concrete reference, Stickthison lists the American Flag Multicam Morale Patch (PVC) at 3 inches wide by 2 inches high, with hook/loop backing. That measurement describes that patch—not every morale patch, and definitely not every hat panel.
A receiving area that barely matches the patch on a flat table still needs an on-gear check. Fit means supported edges during use, not just matching ruler marks.
Expected result: every selected gear piece supports the patch without an edge hanging over a seam or curling around a tight curve.
Receiving-panel setup
Choose how each piece of gear will receive the patch before attaching anything. For this 2026 workflow, start with existing loop wherever it passes the fit check; modify gear only when necessary.
| Receiving option | Best for | Advantage | Limitation |
|---|---|---|---|
| Existing loop panel | Gear already built for patches | No added mounting layer | Its size and position are fixed |
| Sewn-on loop panel | Sewable gear approved for modification | Creates a dedicated receiving area | Stitching permanently changes the gear |
| Adhesive-backed loop panel | Surfaces explicitly approved by the adhesive maker | Avoids stitching where the material allows it | Adhesive compatibility, preparation, and curing requirements apply |
None of these options makes the patch permanently retained. Hook-and-loop releases by design; an exposed edge can catch and peel.
Prepare each receiving panel
- Existing loop: inspect the stitching and remove loose debris. Reject a panel that is pulling away from its mounting surface.
- Sewn-on loop: choose a position clear of zippers, straps, and access points. Follow the gear maker’s modification guidance; use a repair professional when construction or protective layers make stitching unsuitable.
- Adhesive-backed loop: confirm the adhesive maker approves the exact surface. Follow its cleaning, application, and curing instructions rather than inventing a universal wait time.
- Leave the patch off until the receiving panel is ready for use. Do not test fresh adhesive by immediately peeling against it.
Expected result: the receiving panel stays attached to the gear when you remove the patch. If the panel follows the patch into your hand, you have assembled a very small failure demonstration.
Set a parking location
- Choose one dedicated loop parking panel near where you unload your gear.
- Position it somewhere accessible without opening your entire storage setup.
- Put the patch there whenever no gear piece is carrying it.
- Keep exposed hooks away from knit clothing and loose fabric during storage.
Expected result: the patch has a known home between outings. “Somewhere in the range bag” is not a location; it’s the opening line of a search party.
Transfer and retention check
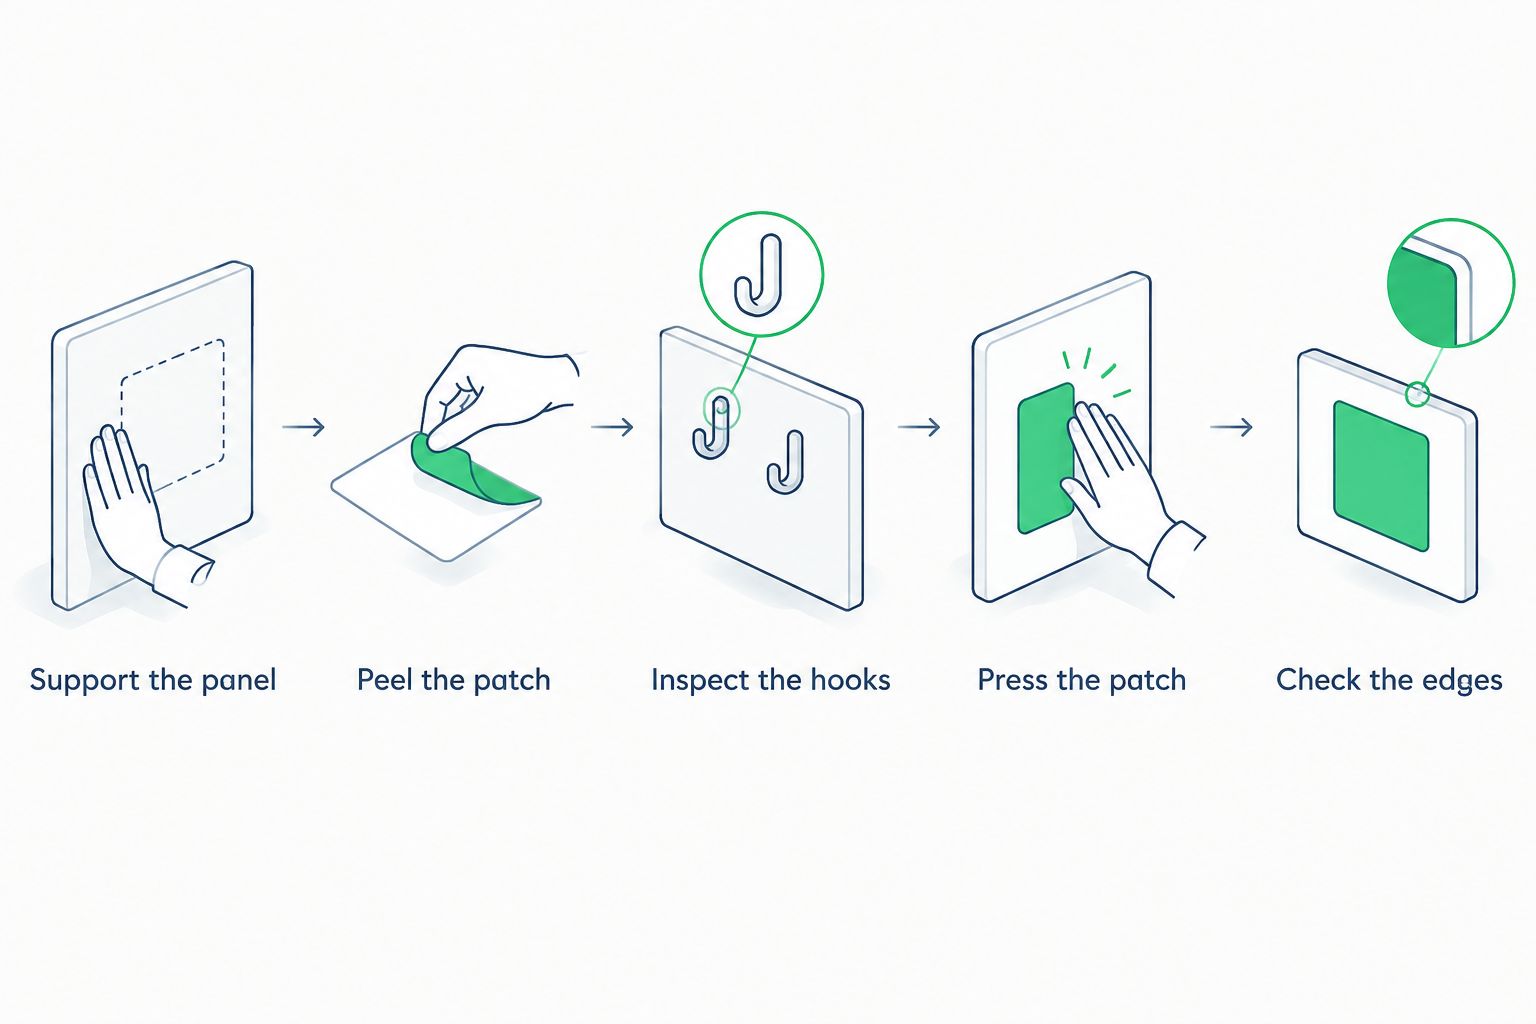
Use the same sequence for every handoff. The goal is not a theatrical rip followed by a blind slap onto the next bag.
Run the transfer
- Support the panel. Hold the old receiving panel or the gear directly behind it.
- Peel the patch. Lift an accessible edge and peel progressively rather than yanking the whole patch straight outward.
- Inspect the hooks. Remove visible lint or debris gently, without flattening or tearing the hooks.
- Press the patch. Align it within the destination panel and press across the entire backing, including the perimeter.
- Check the edges. Flex the bag or put the hat on, then inspect for lifting, interference, or exposed hooks.
Expected result: the patch sits within the receiving area and stays seated during ordinary handling. This is a fit check, not a measured retention certification.
Test the real gear load
- Pack the destination bag as you normally carry it, or wear the destination hat.
- Operate nearby zippers, handles, straps, and pockets through their normal movement.
- Carry the item and check whether clothing or adjacent equipment catches the patch edge.
- Reposition the patch within the panel if possible. If the fit still fails, remove that gear piece from the swap system.
For a simple trial, use 1 patch across 3 gear pieces, with 1 separate parking panel. Those are setup choices, not a claim about how many transfers a patch will survive.
Expected result: you know which receiving points work under actual carrying conditions. Keep only those. A patch that fights the zipper has lost the argument.
When the gear changes: reverse the workflow
The adjacent workflow starts with the destination, not the patch: choose today’s bag, then retrieve the patch from its current home. This works when you rotate between a range bag, an everyday pack, and a patch-ready hat.
- Inspect the destination’s loop panel before removing the patch from its current location.
- Confirm the patch still fits the destination’s loaded or worn shape.
- Transfer it using the same supported peel, alignment, and edge check.
- If the destination fails inspection, leave the patch on the parking panel rather than improvising with glue.
Best for changing gear: destination-first swapping prevents you from stripping the patch off one bag only to discover the next bag cannot receive it. Its limitation is that every destination still needs a compatible panel.
For your 2026 routine, make the transfer part of packing—not a task performed while holding keys, coffee, and an unreasonable amount of other crap. When you unload, return the patch to its parking spot unless tomorrow’s gear is already selected.
Troubleshooting
The patch will not stick at all
Check for hook-to-hook contact or an attached backing cover. Two rough hook surfaces do not form the intended connection. Remove any separate loop cover from the patch, then test against an actual receiving loop panel.
If the patch has no hook backing, stop. Adding a receiving panel to the bag does not magically change the patch’s attachment method.
A corner lifts when the bag is packed
Check the loaded shape and patch outline. A curved or undersized panel can leave edges unsupported even when the empty bag looked fine. Move the patch onto a flatter, fully supporting area or exclude that destination.
Do not solve a fit problem by covering the corner with permanent adhesive. That defeats the swap system.
The receiving panel comes off with the patch
Fix the panel attachment before another transfer. Inspect loose stitching or an adhesive bond that has separated. For adhesive-backed loop, revisit surface approval, preparation, and curing instructions.
Support the receiving panel during removal, but do not treat careful peeling as a repair for a failing mount.
The hooks are full of lint
Clean the backing gently and protect it between uses. Remove visible fibers by hand or with a soft brush, taking care not to damage the hooks. Follow the patch maker’s care guidance before using cleaners.
Store the patch on loop rather than loose against clothing. A pocket full of hoodie fuzz is not an attachment upgrade.
The patch is missing before every outing
Use the parking location consistently. Check the last gear piece used, then return the patch to the same loop panel after each outing. A dedicated location addresses the handoff problem; another random pouch merely relocates it.
Customize your workflow
Expand the receiving network only after the first destinations pass the loaded-gear test. Add a new bag, repeat the compatibility checks, and keep the same parking location.
Best for daily swapping: existing loop panels keep the process simple, but fixed panel dimensions limit your patch choices. Best for adding a destination: a properly installed receiving panel creates another mounting point, but modifies the gear and adds another attachment to inspect.
Stickthison morale patches supply the joke; your setup supplies compatibility. Confirm backing and dimensions for the specific patch rather than assuming a whole collection shares the same footprint.
A tidy 2026 setup beats a larger collection of questionable mounting points. Stop expanding when another destination adds hassle instead of useful flexibility.
FAQ
How do I build a velcro patch swap system?
Use a hook-backed patch, compatible loop panels on each gear piece, and a dedicated loop parking panel. Check the fit on loaded or worn gear before making that item part of your rotation.
Can I move one morale patch between a hat and a range bag?
Yes, if both receiving panels engage the backing and support the patch's full outline. Check the hat while wearing it because its curve can lift edges that sat flat on the table.
Why won't my velcro patch stick to my backpack?
Check for a backing cover, mismatched mating surfaces, debris, or a backpack panel that is not receiving loop. A fuzzy-looking fabric is not automatically a compatible attachment panel.
Do I have to sew the patch onto every bag?
No, the patch remains removable when its hooks attach to receiving loop. A bag without suitable loop needs an appropriate receiving panel, which can require a permanent modification to the bag.
Is adhesive-backed loop suitable for every gear surface?
No, adhesive-backed loop requires a surface approved by its manufacturer. Follow the stated preparation and curing instructions, and do not assume approval for one material applies to another.
Are all Stickthison morale patches the same size?
Do not assume a common size across Stickthison morale patches. Check the specific patch's dimensions and backing before matching it to a receiving panel.
Where should I keep a patch when I am not using it?
Keep the patch on a dedicated loop parking panel or a suitable removable loop cover. This gives it a known location and keeps exposed hooks away from clothing.
One last thing
Choose the smallest usable receiving panel before choosing your travelling patch. If the hat is part of the rotation, its panel sets the fit requirement—not the huge loop field on your range bag.
That single decision prevents you from building an elaborate swap system around a patch that only fits the biggest bag. Your favorite joke deserves better than being permanently grounded by a hat.


Comments